Getting Started With Hugo
Making a static blog site in collab with Girls Who Code!
📚 Getting Started With Hugo
Author: Michael Lazeroff
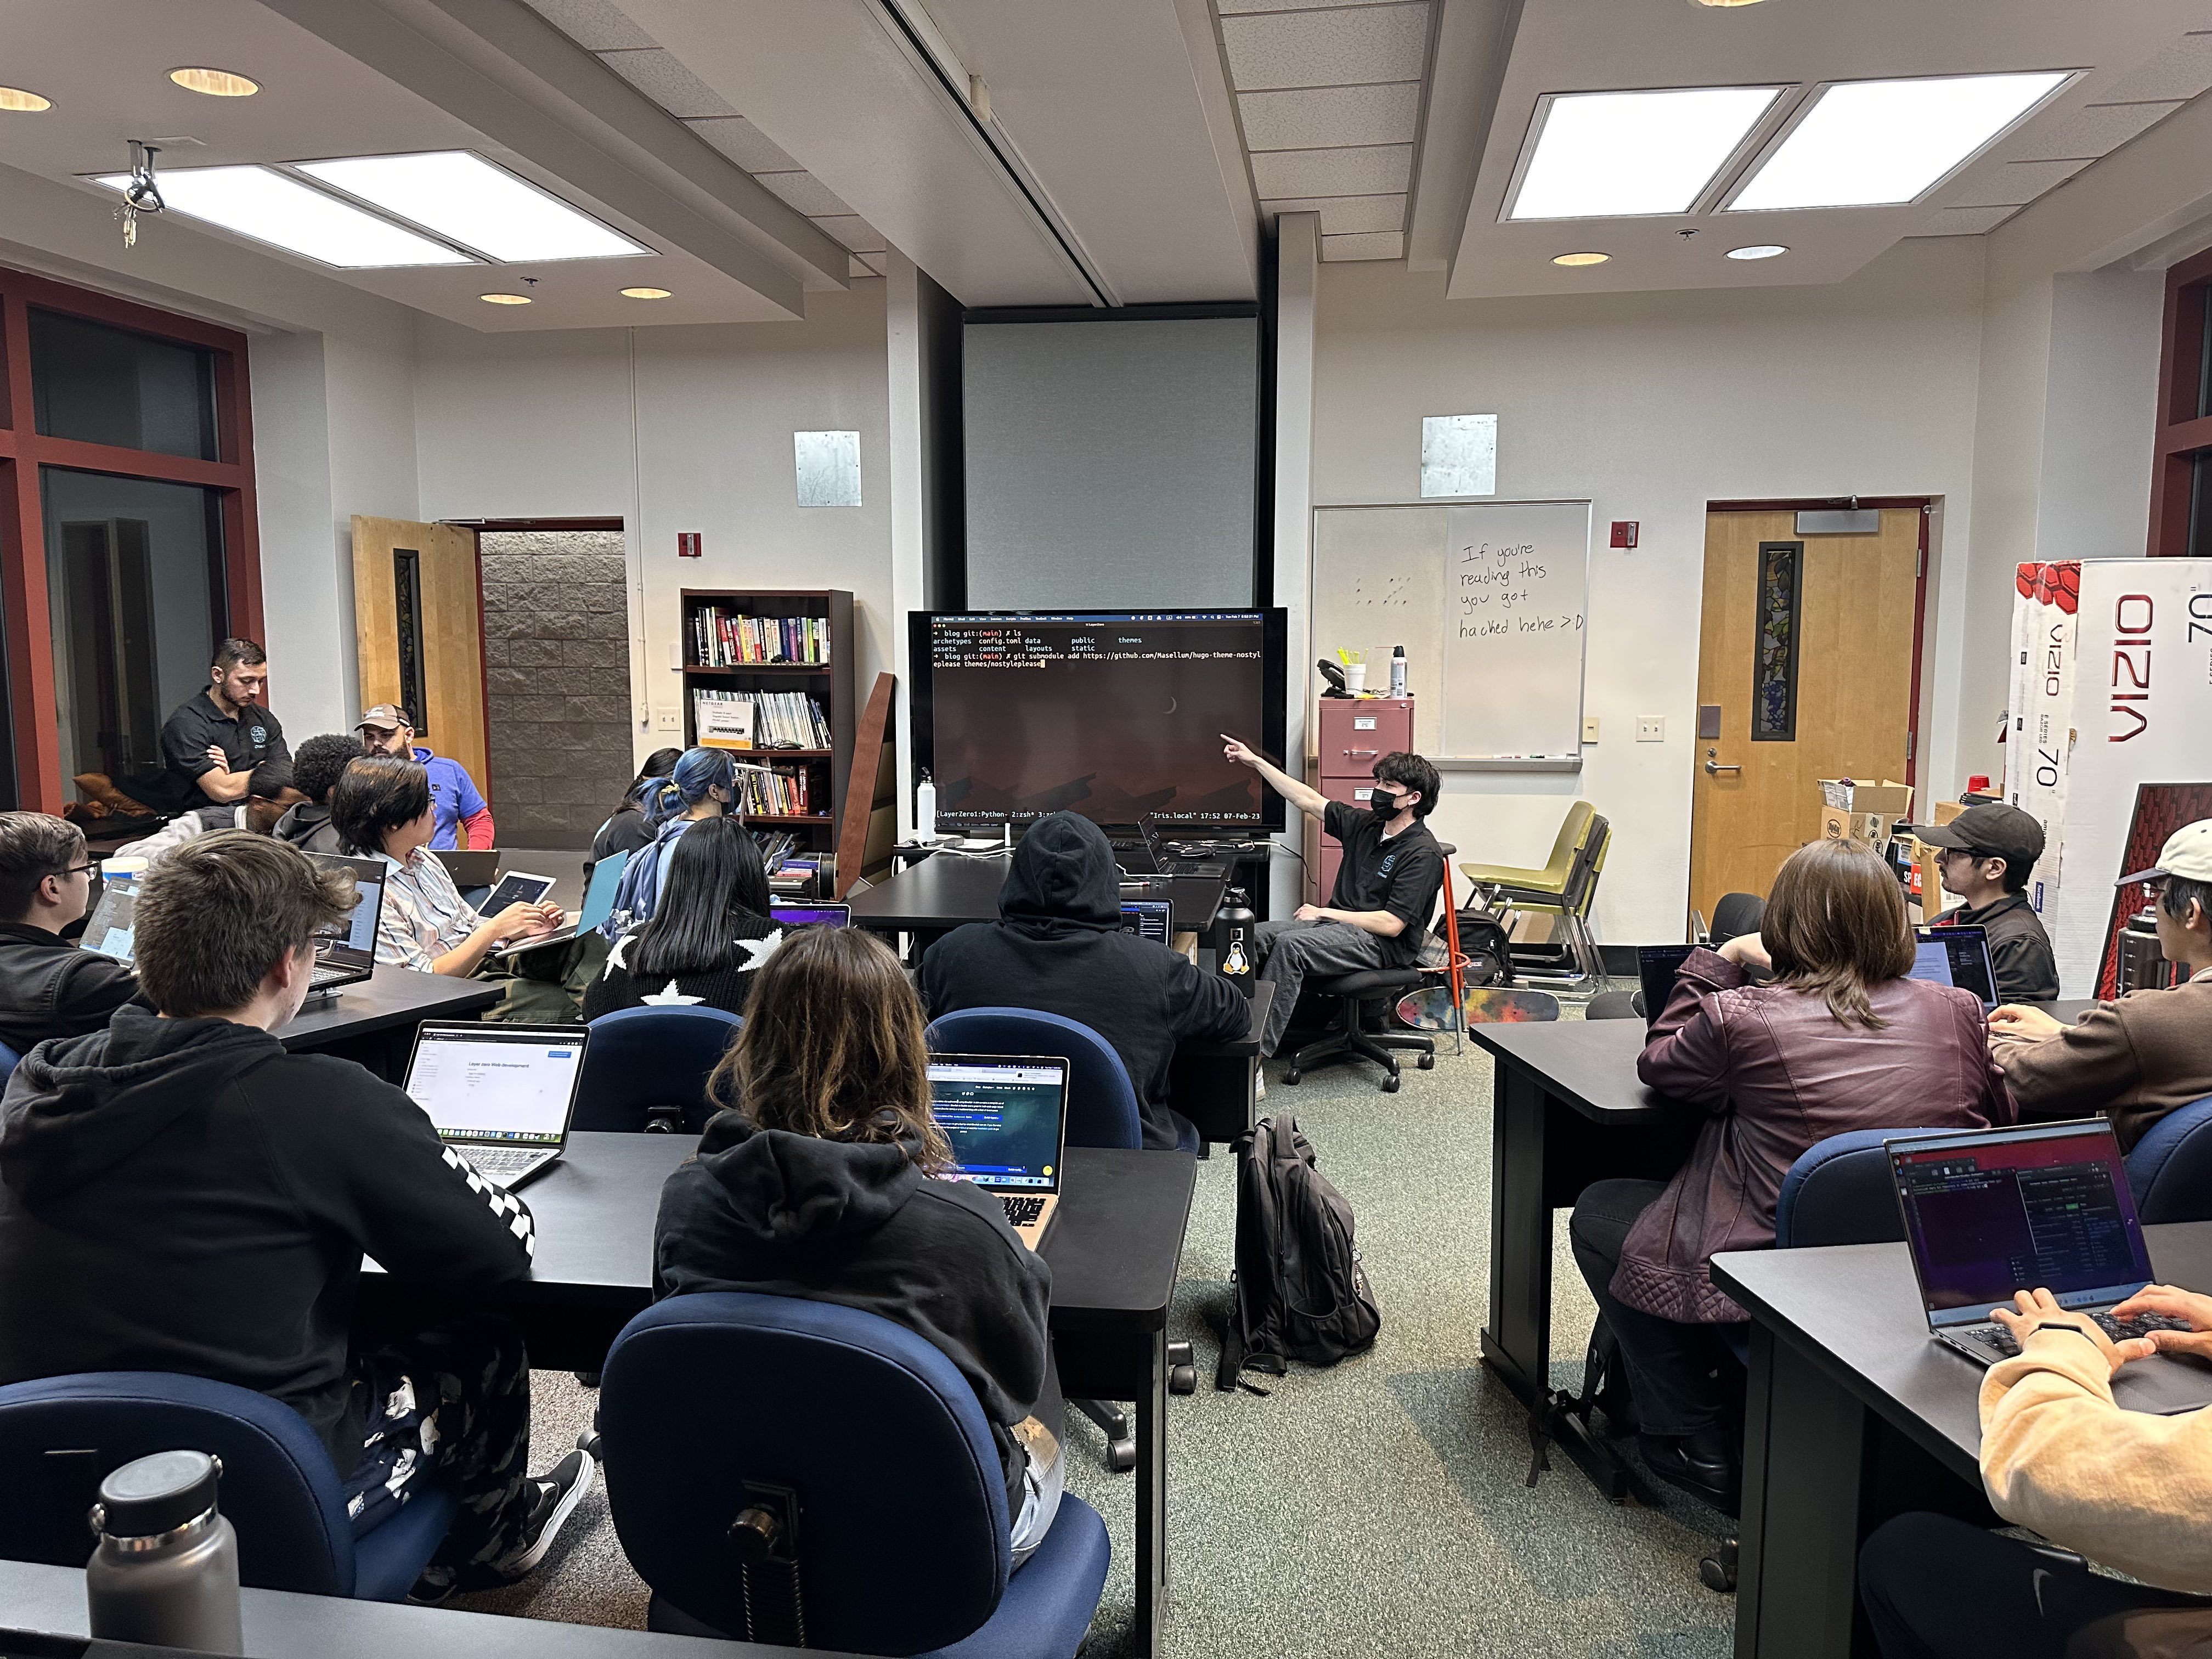
This lab was provided in-person on February 7th, 2023 in CBC-234
💭 What is Hugo?
Hugo is a static-site generation tool written in Go. The tool allows for a quick, beautiful, and easy way to deploy a personal website. No web development knowledge is required, and all content is written using markdown.
What is the purpose of Hugo?
Hugo is best suited for displaying articles and images for a personal portfolio and blog. It is not designed for making dynamic applications, or hosting things like an online store. If your website needs to support more complex use types, other solutions will have to be used.
What will you learn in this guide?
After completing the steps outlined in this guide, you will have a working understanding of
- Creating and configuring a website using Hugo
- Writing content in Markdown
- Deploying your website using Git, GitHub, and GitHub Actions
🎬 Prerequisites
- Access to a command line and knowledge of basic commands
- A Package Manager
- Git
- A GitHub Account
- A Text Editor
Command Line
This walkthrough will assume you have basic knowledge of how to use command line utilities. If you have never used the command line before, I would highly recommend learning some basic utilities first, prior to following this guide.
If you are on a Windows system, check out guides for Powershell such as Windows PowerShell/Command Line for Beginners (Tutorial)
For Windows, you might also consider looking into WSL, or the Windows Subsystem for Linux. See tutorials such as Windows Subsystem for Linux (WSL) Tutorial & How To
If you are on a MacOS or Linux system, check out guides such as Introduction to Linux and Basic Linux Commands for Beginners
Package Manager
Package managers allow for easy sharing and updating of software packages. The preferred way to install Hugo will be using a package manager, so please install an appropriate package manager for your system.
- Windows: Chocolatey
- Mac: Homebrew
- Linux: It is likely your distribution of Linux already comes with a package manager installed. If you are unsure, look up the package manager for your specific distribution.
Git and GitHub
While configuration of Hugo can be done with basic knowledge of the command line, the steps shown in this guide to deploy your website to the internet require knowledge of Git and GitHub. Similar to the previous section, if you have never used Git or GitHub before, check out guides such as Git and GitHub for Beginners - Crash Course
Text Editor
For editing config and markdown files, you will need a text editor. One of the most popular text/code editors is Visual Studio Code. If you have never used a text or code editor before, I would suggest starting with this one.
✅ Hugo Installation
In order to begin using Hugo, we must install it. The preferred way to install Hugo is by using a package manager. If your package manager/system is not listed below, check out the Installation Docs For Hugo to see if it is there.
If installed using a package manager, Hugo does not require the Go programming language to be installed on your system.
Windows
choco install hugo-extended
Mac
brew install hugo
Linux
sudo apt install hugo
If you do not want to use a package manager to install Hugo, you can build it directly from it’s source code. Check out Installation Docs For Hugo and select your system.
🎨 Creating A New Site
Hugo is designed around a number of simple commands to make configuration as simple and seamless as possible. The first of these commands is the hugo new site <site-name> command.
Note: Any commands that have < > around them should be replaced with an appropriate name.
To make a new site in a folder called blog, run the following command:
hugo new site blog
In your current working directory, you should see that there is a new folder called blog that was created, this is where all your site configuration will be done.
To start configuring, navigate to the new folder:
cd blog
Directory Structure
The hugo new site command creates the required project scaffolding automatically. The diagram below shows the structure of the project:
blog/
├── archetypes/
│   └── default.md
├── assets/
├── content/
├── data/
├── layouts/
├── public/
├── static/
├── themes/
└── config.toml
If you want to learn exactly what all these folders should contain, you can check out Directory Structure Explained from Hugo’s docs.
I will, however, give a brief overview of the most important of these folders/files.
- archetypes/
- When creating new posts, Hugo will source files in this directory to use as templates. The
default.mdfile is the basic template file for a post.
- When creating new posts, Hugo will source files in this directory to use as templates. The
- content/
- This is where all your posts will exist. All of your posts will be
.mdfor markdown.
- This is where all your posts will exist. All of your posts will be
- public
- This is where all the files needed to display your website are held. Hugo first will generate the appropriate files, and then place them here.
- static
- The static folder is where you can place images, and new CSS/HTML files for use on your website. These files are copied directly over to the
publicdirectory when Hugo generates all of the files.
- The static folder is where you can place images, and new CSS/HTML files for use on your website. These files are copied directly over to the
- themes
- The folder with your chosen theme should go here.
- config.toml
- This is where the configuration for your site is done. Simple themes might require only the single
config.tomlfile, while more complex themes might have many files to configure.
- This is where the configuration for your site is done. Simple themes might require only the single
🎉 Themes
Hugo relies on themes in order to know how to style your website. There are many prebuilt themes, and there is always the option of creating your own.
All themes will support the basic functionality of Hugo, however, themes can look drastically different to each other based on the intention of the theme author.
For your actual website, you can browse the Hugo Themes to see which one resonates with you. For this writeup, I will be showcasing an extremely minimal theme. The reason for this is that the configuration is really small, and so that you can potentially learn to style themes to your own liking.
Installing A Theme
To install a theme, we must first download the theme’s files into the theme/ directory.
For your chosen theme, read the documentation, since every theme might have a different approach to configuration. Each theme will also include an installation guide, however, most can be installed in the following manor - which is to add the theme as a Git Submodule.
At the base of your blog folder, initialize the Git repo:
git init
Add the theme as a Git Submodule:
git submodule add https://github.com/Masellum/hugo-theme-nostyleplease themes/nostyleplease
In the above command, we are telling Git to add https://github.com/Masellum/hugo-theme-nostyleplease into our themes folder with the name nostyleplease. Again if you prefer to use a different theme, you can simply replace the GitHub link and desired folder name.
Setting The Theme
Now that our theme is installed, we must tell Hugo that we want to use it. Setting the theme is the first change that you will make to the configuration files.
First, you will need to open the config.toml file in your text editor of choice. Once the file is open, we then need to append the following line to the end:
theme = 'nostyleplease'
This will set the theme to the one we installed previously. Change the theme name appropriately if you installed a different theme.
Theme Specific Configuration
Most themes will come with their own configuration model. Simple themes like nostyleplease will make use of only a couple of configuration files, while larger and more complex themes might use many directories of configuration files. Make sure you are reading the documentation for your chosen theme.
🌎 Serving The Site
With the theme installed and configured, we can preview our site on a local port using:
hugo server
Hugo will output text about the site, including a line saying Web Server is available at http://localhost:1313/ (bind address 127.0.0.1).
To view the website, copy the address it outputs for you into a browser.
When we make changes to our configuration, it will reflect in our local preview in real time.
It’s beautiful isn’t it :)
🎃 Basic Configuration
Lets go ahead and update the title of the website in config.toml
title = 'Hugo With Layer Zero'
Once this is done, the title in the preview will change.
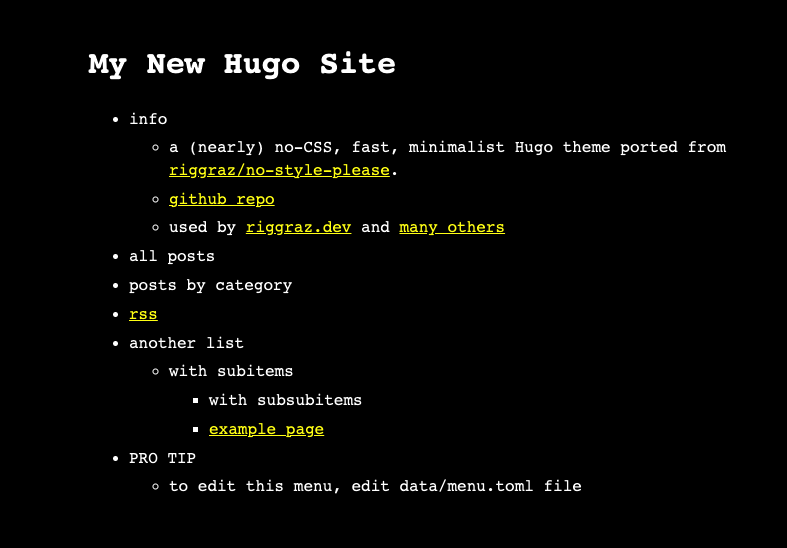
For nostyleplease, you will notice at the bottom that it says to edit the menu at data/menu.toml. This is an example of a theme’s unique approach to configuration, as other themes could have you edit the menu in a different file.
We need to copy that file from the theme folder to our own data/ folder.
cp themes/nostyleplease/data/menu.toml data/menu.toml
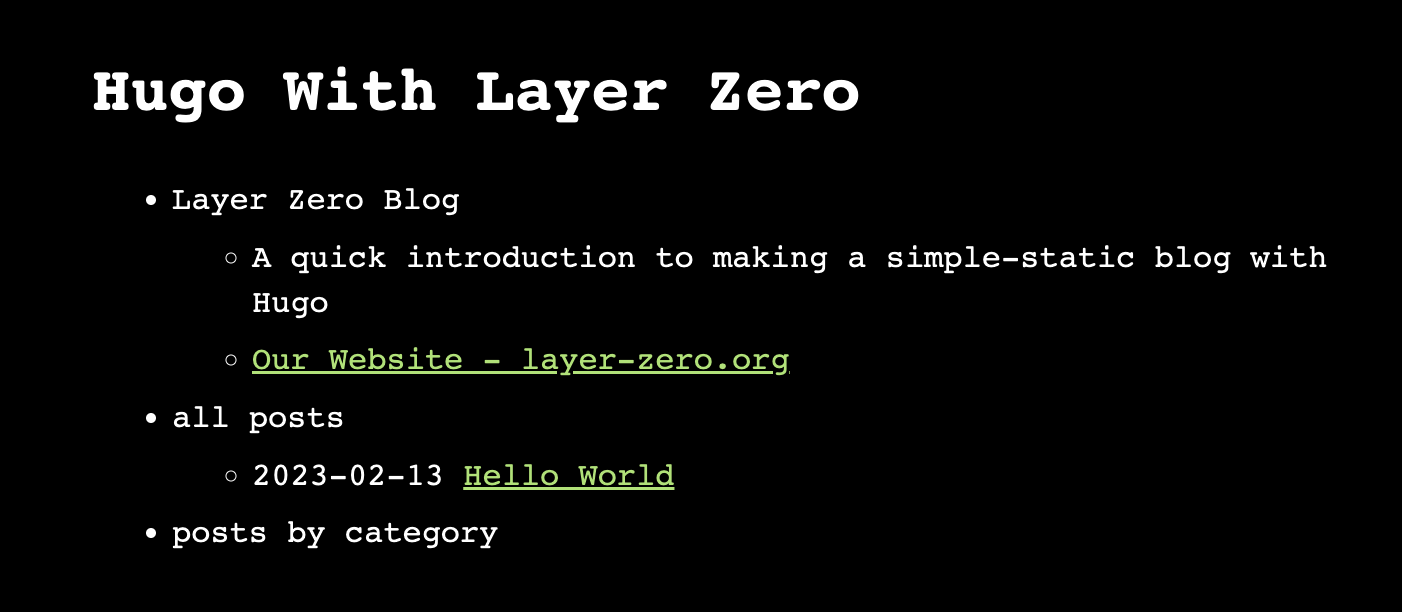
After some changes in the data/menu.toml file, my local preview looks like this:
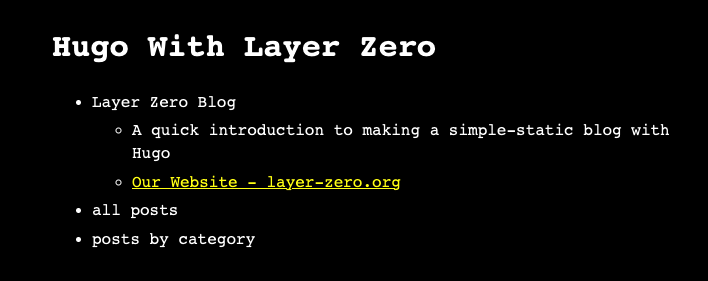
These are the changes that were made:
- Update the
infosection at the top - Add the external link to the Layer Zero website using
[Our Website - layer-zero.org](https://layer-zero.org) - Remove the
RSSfeed section - Remove the
another listsection - Remove the
PRO TIPsection, since we know how to edit the menu
Configure to your needs and what content you want to display. Follow the format of the other sections that were present in data/menu.toml.
📝 Content
The whole point of a static blog is for making content, so lets make some content!
Note: If you are following along exactly, DO NOT RUN ALL OF THESE COMMANDS. I am just showing what is possible first. Read through this section and perform the specified command at the end if you are wanting to follow along.
The hugo new <path> command will create a new markdown file at the specified path IN the content/ directory:
hugo new hello-world.md
Including just the filename will place the new file in the content/ folder with no nesting.
content
└── hello-world.md
These markdown files will serve as the content for each post. It is recommended when using the hugo new command that you give the files an appropriate name. Hugo will do its best to parse the filename into an appropriate title.
Content Organization
Hugo allows for users to organize their content/ folder in whichever way they prefer. You can have all your posts on one level like this:
hugo new <file name>.md
content
└── firstpost.md
└── secondpost.md
└── thirdpost.md
└── fourthpost.md
Or, you can split content up into different sub-sections using folders:
hugo new <folder>/<file name>.md
content
├── essays
│   └── firstessay.md
├── projects
│   └── firstproject.md
└── writeups
    └── firstwriteup.md
However, the recommended way is to use Page Bundles. Page Bundles essentially allow you to organize posts into their own folders, allowing you to place all the assets necessary for the post (like images) in the same folder.
For example, I am going to make a new post called Hello World with the Page Bundles design. I will run the following command:
hugo new hello-world/index.md
This is telling Hugo to make a new folder in content/ called hello-world/ as well as the file index.md. The post title will be hello-world since that is the name of the directory, but the content will be placed in index.md.
This is what Hugo creates in the content/ folder:
content
└── hello-world
    └── index.md
If you wanted to section your posts by type, such as in the example showcasing different sub-folders, you can still do that. For example, if I wanted to place a new post in a posts folder, I can just run:
hugo new posts/hello-world/index.md
The content/ folder would look like:
content
└── posts
    └── hello-world
        └── index.md
If you wanted to have a separate folder for something like projects, you would do the same thing. Page Bundles give the most flexibility for posts and easy of use, so it is recommended you do it this way.
If you are following along exactly, type the following command if you haven’t already:
hugo new hello-world/index.md
Markdown
If you are unfamiliar with markdown I recommend checking out the Markdown Syntax Guide. Guides such as this one layout all the different options that you have to format your text, and even include what your markdown will be rendered as.
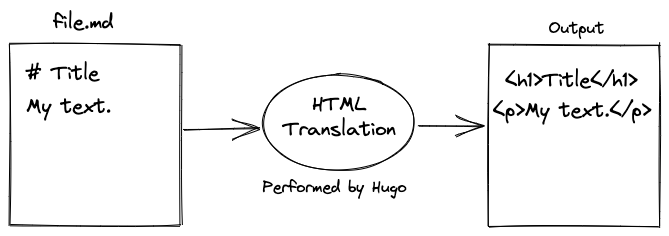
The below diagram shows what is happening with markdown. Markdown syntax is easily translated into HTML, which is used to display text to a webpage or any app which can render HTML.
Markdown is commonly used for ease of use and portability. With markdown, you can render it using a number of different apps, including VSCode.
Templates
Recall that Hugo uses templates in archetypes/ when creating new posts. Since we have not made any changes to the default file, default.md, creating a new post uses that file as a template:
---
title: ""
date:
draft: true
---
We see that the functions it uses are very simple. The title field is populated by taking the filename and replacing any dashes with a space. The date field is filled with the current date, and the draft field is set to true.
Since I already created my hello-world post from above, I just have to open it in the text editor to make changes. Remember, since I used the page bundle design, the file I am going to edit is content/hello-world/index.md. Here are some changes that I made:
---
title: "Hello World"
date: 2023-02-11T19:16:51-08:00
draft: false
---

# Welcome!

This is my very first post. All of this is written using Markdown.
Along with adding the new content in markdown, I also changed the draft status to false. When Hugo builds your final site, it will not include posts that are marked as draft: true. If you want your post to be included with the final build of your site, change the status to false.
After doing that, I now see this in my local preview:
Our post has now shown up, and if we click on it we will see the content!
Organizing With Tags
You can tag content for organization purposes. Theme authors will choose different ways to handle displaying tags.
To add a tag to a post, just add a new tags field in the metadata section. You can add multiple tags by including commas between the entries, eg. ['tag1', 'tag2', 'tag3']
---
title: "Hello World"
date: 2023-02-11T19:16:51-08:00
draft: false
tags: ['update']
---

# Welcome!

This is my very first post. All of this is written using Markdown.
Tags are a way you can organize your posts by category or topic. Check your theme documentation to see how they support tags.
Adding Images
The reason for using Page Bundles as our content organization scheme of choice is for easy handling of assets such as images in our posts.
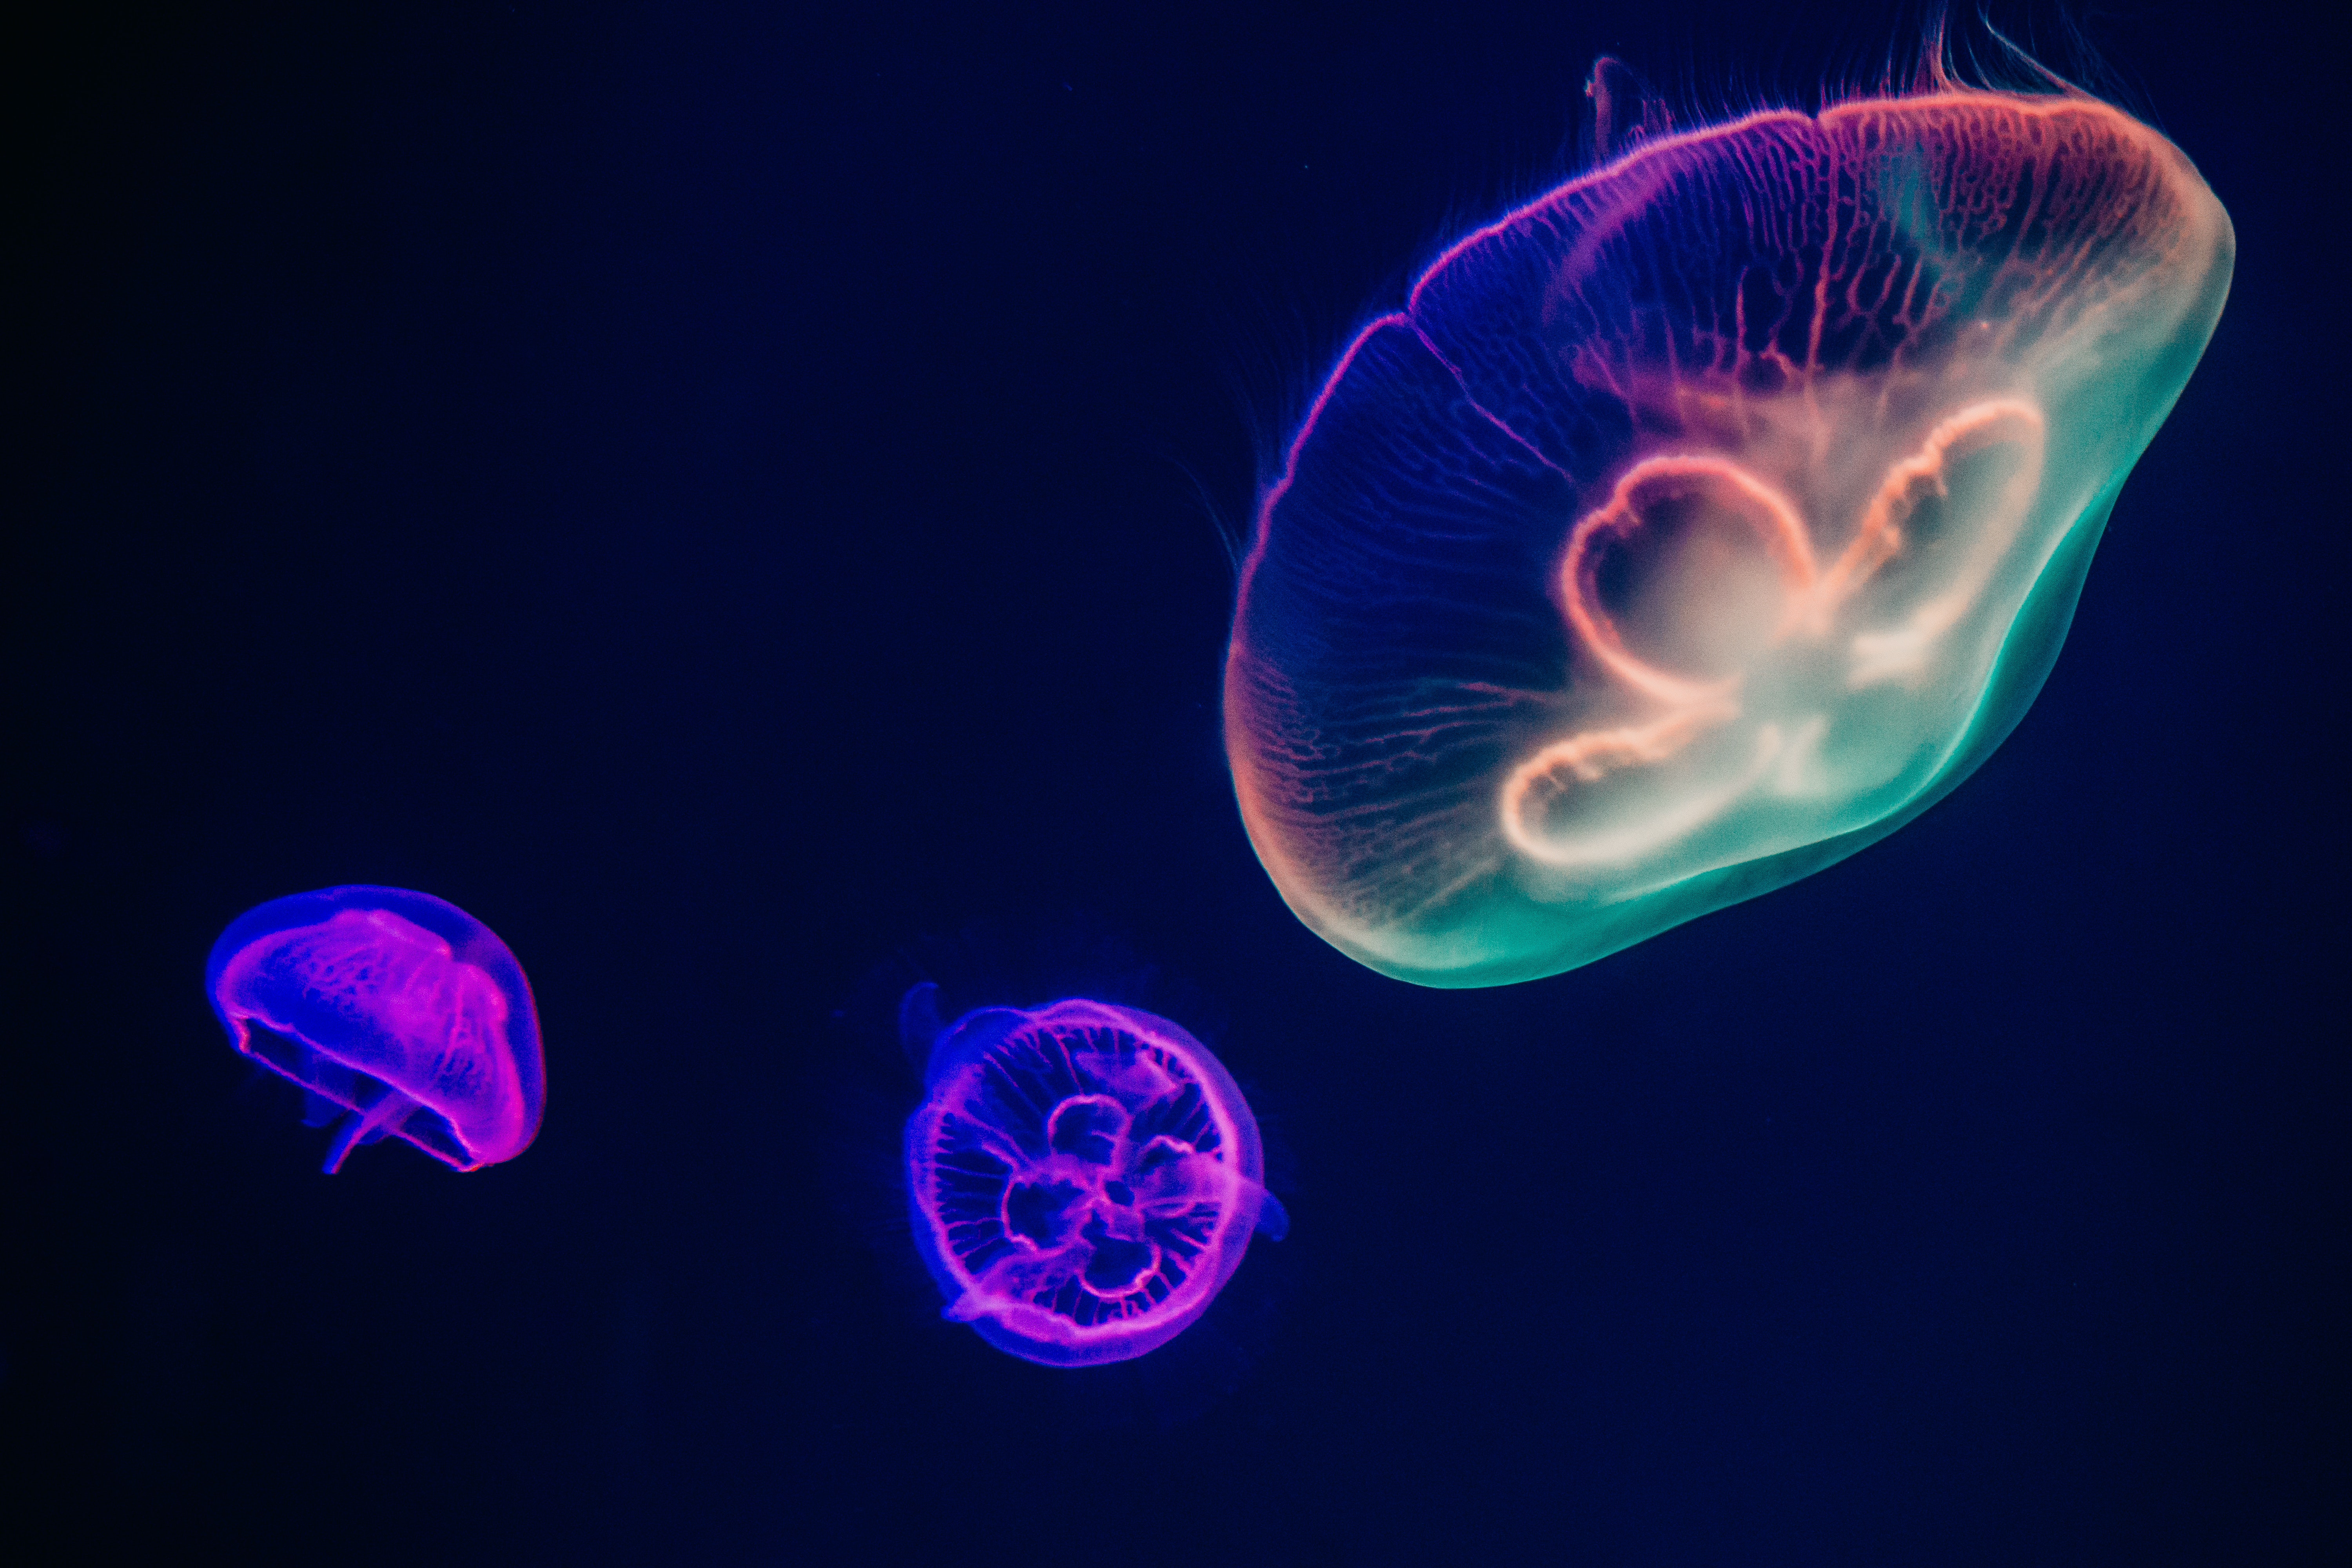
Lets say that I want to include this cool picture of Jellyfish in my post:
First, I will need to place the image in my post folder. Since we are working on hello-world I will just add the file titled cool-jellyfish.jpg into there. After doing that, this is what the folder contains:
content
└── hello-world
    ├── cool-jellyfish.jpg
    └── index.md
There are now TWO files in my hello-world post: my actual content in index.md and my image asset cool-jellyfish.jpg.
To display the image in the post, you can use standard markdown syntax to display the image:
---
title: "Hello World"
date: 2023-02-11T19:16:51-08:00
draft: false
tags: ['update']
---
# Welcome!
This is my very first post. All of this is written using Markdown.

The image can now show up in your preview.
Linking To Other Posts
Hugo uses special functions to resolve the paths of documents. This ensures that links between posts will always work.
I am going to add a new post to content/ that I want to link to my original hello-world post.
To link a post, it needs to exist first, so I am going to make a new post called pentesting
hugo new pentesting/index.md
Our content folder now looks like this:
content
├── hello-world
│   ├── cool-jellyfish.jpg
│   └── index.md
└── pentesting
    └── index.md
In practice, you would of course do all the similar steps for the pentesting post such as adding the markdown content and setting the draft field to false. Inside my hello-world post I want to link to the pentesting post. I will add the following into content/hello-world/index.md:
[Pentesting]()
The ref function will find the document specified by using the relative path. You can reference pentesting/index.md or just pentesting, Hugo will find it regardless.
For more information on the ref and relref functions, check out Links and Cross References from the Hugo docs.
👍 Deploy On GitHub Pages
If you have made it to this point, you should be able to do the following things with Hugo:
- Create a new site
- Install themes
- Live preview your site locally
- Create and configure content
Since Hugo is responsible for just generating the static files needed for a website, we must take those files and host them on something. The easiest way in my opinion is using GitHub pages, and this will be the final step of this tutorial.
Two Approaches To Hosting On GitHub Pages
Two Repo Approach
Since all you need for your website are the contents of the public/ directory after Hugo builds your site, it is reasonable to split up your files into two separate repos:
- Static/public files - these are the generated files by Hugo and are served on a Personal/Organization repo.
- Hugo configuration files - these are all of the other files to configure your site and are served on a separate Project repo.
With this approach, your website will be hosted at a URL like this:
https://<USERNAME|ORGANIZATION>.github.io/
This approach has a cleaner URL, but can be a little tricky to setup. This tutorial will not be covering the two repo approach, but there are other tutorials that exist which do.
Mono Repo Approach
The Mono Repo approach leverages the branching feature of Git by hosting all your configuration files on one branch, and serving all of your static files on a different branch called gh-pages.
The URL for this approach looks like this:
https://<USERNAME|ORGANIZATION>.github.io/<PROJECT>/
This approach has a longer URL, but is a little easier to set up.
Setting Up GitHub Actions
GitHub actions allows you to specify actions to be performed based on triggers you set up for your GitHub repo. We will be setting up a GitHub action which builds and deploys our website when we make a new push to the repo.
Next, we will have to make a new file at the path .github/workflows/gh-pages.yml. Once created this should be the path setup:
.github
└── workflows
    └── gh-pages.yml
Open gh-pages.yml in your text editor and add the following content:
name: github pages

on:
  push:
    branches:
      - main  # Set a branch that will trigger a deployment
  pull_request:

jobs:
  deploy:
    runs-on: ubuntu-22.04
    permissions:
      contents: write
      packages: write
    steps:
      - uses: actions/checkout@v3
        with:
          submodules: true  # Fetch Hugo themes (true OR recursive)
          fetch-depth: 0    # Fetch all history for .GitInfo and .Lastmod

      - name: Setup Hugo
        uses: peaceiris/actions-hugo@v2
        with:
          hugo-version: 'latest'
          extended: true

      - name: Build
        run: hugo --minify

      - name: Deploy
        uses: peaceiris/actions-gh-pages@v3
        if: github.ref == 'refs/heads/main'
        with:
          github_token: $
          publish_dir: ./public
This configuration is based on the provided workflow from the Hugo Documentation: GH Actions
Here is a quick explanation of what we are specifying in the file:
- On a push to the “main” branch, run this workflow
- Create a new virtual machine and install Hugo (the extended version as well)
- Build the Hugo site (creates the files in the
public/directory) - Deploy the files from the
public/directory onto thegh-pagesbranch.
Create A New GitHub Repo
Create a new repo on GitHub to host your blog. It can be named whatever you want, but for this tutorial I will call it example-hugo-blog. Use whatever name you prefer. Make sure it is public. There are a few more steps we will take before we push our code to the new repo.
Configure The Base URL
We have to configure the base URL for our site in order for it to work. To do that, we will need to edit the config.toml file. Open that file and edit the base url to look like this:
baseURL = 'https://<username>.github.io/<repo-name>/'
For example, my baseURL would look like this:
baseURL = 'https://lazeroffmichael.github.io/example-hugo-blog/'
Change it to work for your GitHub username and repo name. This, as the name suggests, will be the baseURL when our actual website is deployed.
Commit and Push
At this point we have all the configuration we need. The only thing that is left is to commit and push all of our changes.
To commit your changes:
git add .
git commit -m "initial commit"
Before we can push our changes, we have to tell Git where we want to push our repo to. To do that, go to the empty repo on GitHub, and copy what it says under the header …or push an existing repository from the command line
For my repo, this is what is says to do:
git remote add origin https://github.com/lazeroffmichael/example-hugo-blog.git
git branch -M main
git push -u origin main
Once you run these commands, you should see your code show up in the GitHub repo.
If there are any issues with the Action, try making sure that GH actions is enabled for the repo in the settings.
Final GH Pages Steps
If everything works you will have two branches: a branch called main and a branch called gh-pages with the static files created by Hugo.
The final step is we have to tell GitHub which branch to serve our files from for GitHub Pages.
In the settings, we need to tell Hugo to serve from the gh-pages branch:
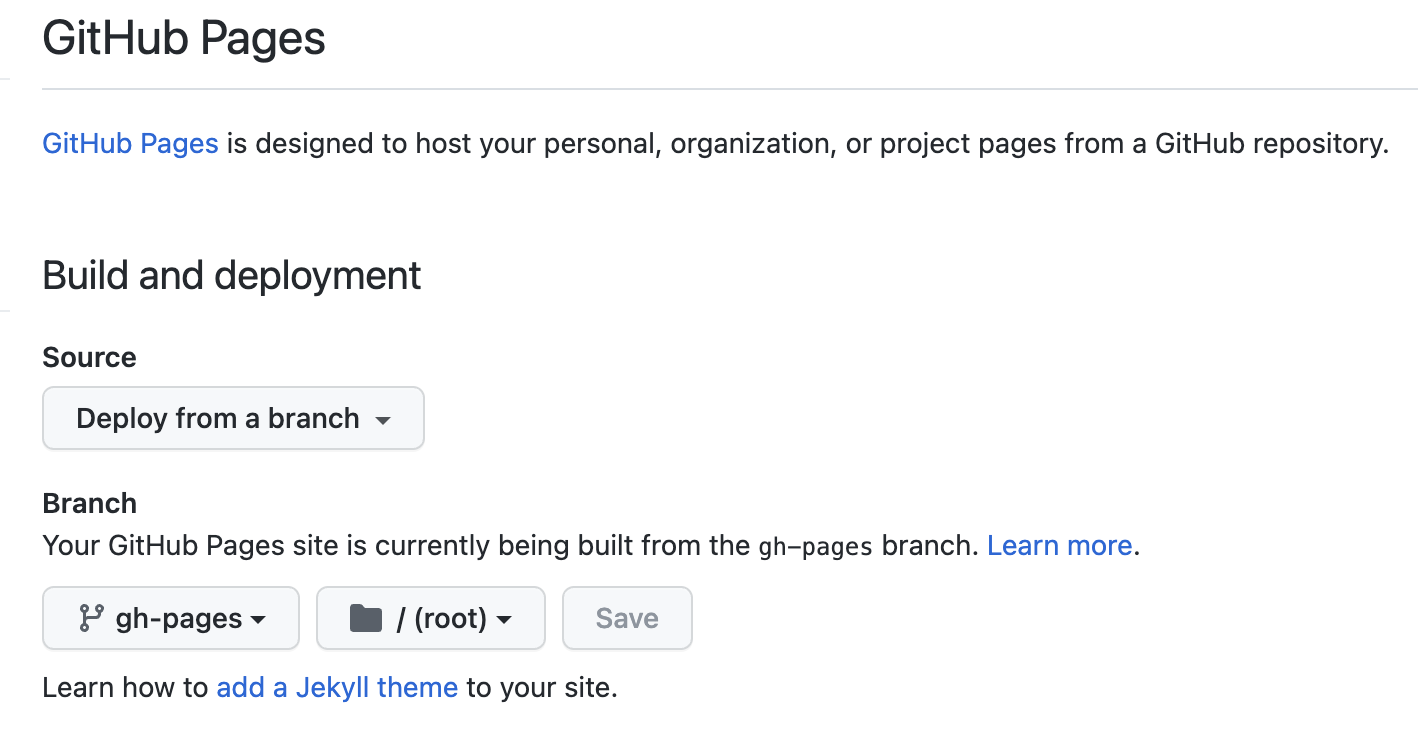
After that is saved, you can refresh the page and the link to the new site will show up.
Congratulations! You have set up and deployed your first Hugo site. Any new changes you commit and push to GitHub will automatically update and deploy your new site. If there are any other questions, you can reach out to layer_zero@unlv.edu.
For the repo with the example code, see https://github.com/lazeroffmichael/example-hugo-blog
And for the deployed website see https://lazeroffmichael.github.io/example-hugo-blog